Workshop and Project Requirements
Trapunto Workshop with Ann Hibberd
Monday 10th February 2020 10am to 4pm.
Monday 10th February 2020 10am to 4pm.
Requirements from Ann
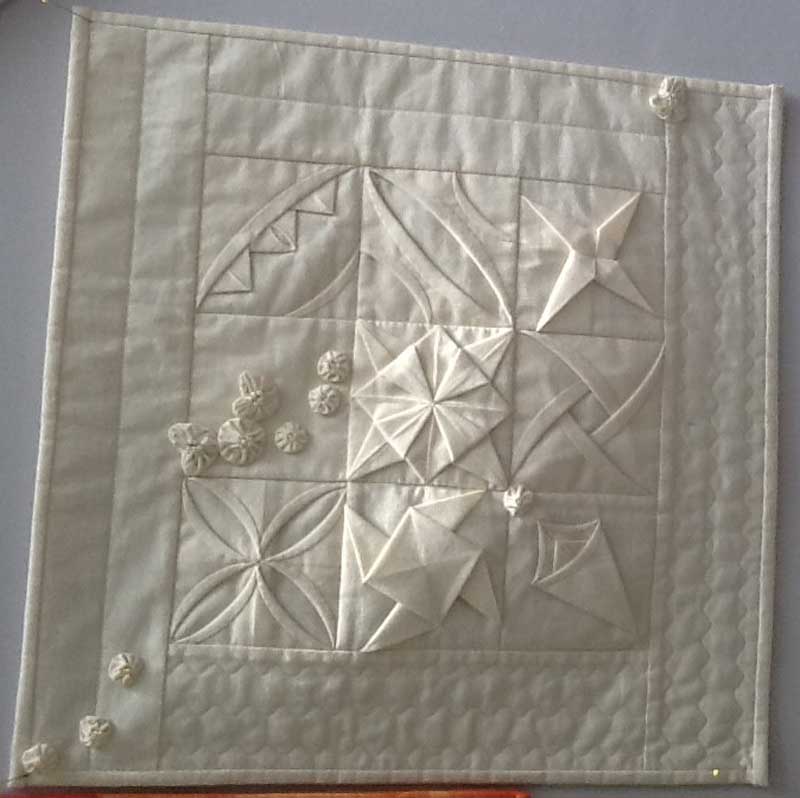
Italian Corded Quilting & Trapunto
Both of these techniques give a raised or stuffed appearance. The difference is that with the I.C.Q. the patterns are outlined with two parallel lines of stitching which then have a cord threaded through, whereas with Trapunto the shape is outlined with a single line of stitching and the whole shape is then stuffed.
** This can be difficult to find but Sylvia Critcher sells skeins on-line. I will have some wool pencil roving with me that can be bought by the metre (25p/metre) on the day
* I will have the boxes of FQs with me (but not matching threads)
Italian Corded Quilting & Trapunto
Both of these techniques give a raised or stuffed appearance. The difference is that with the I.C.Q. the patterns are outlined with two parallel lines of stitching which then have a cord threaded through, whereas with Trapunto the shape is outlined with a single line of stitching and the whole shape is then stuffed.
- * Plain, light coloured cotton fabric for the top. A fabric with a slight texture can be suitable. Patterned fabric competes with the cording and too dark a colour won’t show the design. It helps if you can see the pattern through the fabric
- Light-weight, loose weave fabric such as muslin or a light-weight calico
- Thread to stitch the design. If the thread matches the top fabric the stitching won’t show so much but a darker value (or contrasting) thread can look very effective. Regular sewing thread is suitable for this
- Erasable fabric marker to mark the design - air erasable marker usually disappears too quickly. I use the Clover Fine White Marker - it works on everything except white fabric!
- Fine, black permanent marker
- Small ruler to use when marking design on fabric
- Hand sewing kit - needles, pins, small sharp scissors, thimble if you use one
- Blunt, large tapestry/wool needle. I’ll have a few spare to borrow
- Small amount of toy stuffing or 2oz polyester wadding (it will be teased apart)
- ** Quilting wool
- Fine Hera/Stiletto/something similar to ease the stuffing into the shapes
- Optional - suitable size embroidery hoop for the piece being worked on
- Tracing paper
- Pencil
- You might want to bring a couple of fabrics and threads as a small sample will be made first (7” to 8” sq) to learn the techniques and then you can start on a more complex design
- A light box if you have one.
** This can be difficult to find but Sylvia Critcher sells skeins on-line. I will have some wool pencil roving with me that can be bought by the metre (25p/metre) on the day
* I will have the boxes of FQs with me (but not matching threads)
Shadow Applique Workshop with Ann Hibberd
2019 10am to 4pm.
Requirements
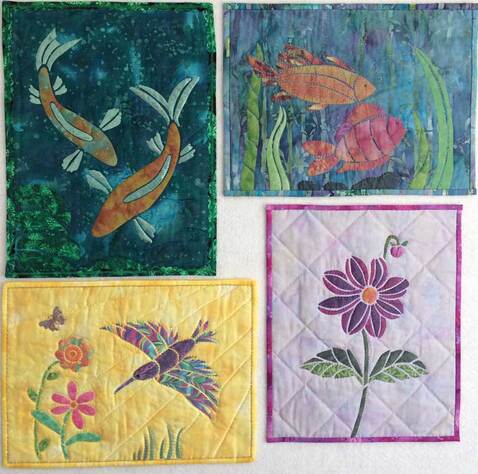
There is a choice of four designs - bird and flowers, fish in reeds, koi with lily pads or a Dahlia flower
• 1 fat quarter of background fabric
• 1 fat quarter sized piece of organza *
• Bondaweb - 0.5mtr is plenty
• Wadding same size as background fabric
• Tracing/greaseproof paper - A3 size
• Pencil
• Low tack masking tape - don’t buy especially
• Fabric scissors
• Paper scissors
• Hand sewing kit
• Threads for decorative stitching to match the coloured fabrics – for example hand quilting threads, rayon, machine embroidery threads
* The organza can be white, cream or another colour to match your background fabric. The darker the organza the more it will knock the colours of the picture back. I will have some colours with me at 50p a piece
There is a choice of four designs - bird and flowers, fish in reeds, koi with lily pads or a Dahlia flower
• 1 fat quarter of background fabric
• 1 fat quarter sized piece of organza *
- 1 fat quarter of backing fabric
- Fabric for binding - (not required on the day - you might not decide this until your picture is completed
• Bondaweb - 0.5mtr is plenty
• Wadding same size as background fabric
• Tracing/greaseproof paper - A3 size
• Pencil
• Low tack masking tape - don’t buy especially
• Fabric scissors
• Paper scissors
• Hand sewing kit
• Threads for decorative stitching to match the coloured fabrics – for example hand quilting threads, rayon, machine embroidery threads
* The organza can be white, cream or another colour to match your background fabric. The darker the organza the more it will knock the colours of the picture back. I will have some colours with me at 50p a piece
Foundation Piecing 'How To' with Gill B at meeting Monday May 20th
Gill says:- "I have used fabric from my “bit drawer” as it will be good enough for practice pieces so there will be no need for members to bring fabric.
I will also bring enough foundation for each person to complete their project (there will be a modest cost for this as I will buy in bulk).
They do need to bring:
- Neutral coloured thread - either cotton or poly cotton
- One new sheet of lightweight sandpaper
- Ruler with 1/4”
- Pencil
- Scissors for cutting fabric
- Sewing Needle and pins
Stained Glass Patchwork Workshop with Ann Hiibberd
Monday 11th February 2019 10am to 4pm.

Requirements
Stained Glass Patchwork
Introduction
This is an appliqué method that uses Bondaweb.
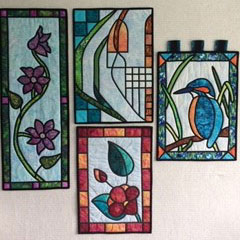
There is a choice of three designs - Art Nouveau Flower, C R Mackintosh Tulip or a Kingfisher.
There is a fourth design - a Clematis. The size is different from the other three designs. It is also slightly more involved and so I would advise choosing one of the other designs if this is the first time you have done this technique.
Requirements
Please test your machine in the few days before the workshop. It is always a shame when people lose valuable workshop time sorting their machines out and I am no expert! You will be using blind hem stitch ( ---v---v--- ). If you don’t have this stitch then a zigzag stitch will do just as well. If you have an open-toe satin stitch foot then bring that as well. I use a size 70/75 needle as it makes smaller holes.
** Although there are a couple of other makes of the fusible bias I recommend the Clover one as it seems to be the best quality and the easiest to use. You will need seven metres for each design and it is available on ten metre rolls.
Christmas Stained Glass Patchwork
Introduction
This is a method that uses Bondaweb.
There is a choice of four designs - Poinsettia, Three Kings, Partridge in a Pear Tree (slightly more advanced than the previous two) or I Saw Three Ships
Requirements
** I recommend Clover as it is the easiest to work with
Please test your machine in the few days before the workshop. It is always a shame when people lose valuable workshop time sorting their machines out and I am no expert! You will be using blind hem stitch ( ---v---v--- ). If you don’t have this stitch then a zigzag stitch will do just as well. If you have an open-toe satin stitch foot then bring that as well. I use a size 70/75 needle as it makes smaller holes.
Stained Glass Patchwork
Introduction
This is an appliqué method that uses Bondaweb.
There is a choice of three designs - Art Nouveau Flower, C R Mackintosh Tulip or a Kingfisher.
There is a fourth design - a Clematis. The size is different from the other three designs. It is also slightly more involved and so I would advise choosing one of the other designs if this is the first time you have done this technique.
Requirements
- Background fabric – A fat quarter for the first three designs, 30cms across the width of the bolt (min) for the clematis picture. A light coloured fabric makes life easier as the pattern can be seen through it
- Backing fabric – same size as front, usually black
- Small pieces of fabric for the picture, colours will depend on which design you wish to do. The fabric for the stem of the clematis needs to be bigger - a 10cm strip. As this isn't a piecing method glitzy fabrics with a slight stretch can be used, but not fabrics with a pile
- Black fabric to bind edges
- 0.5mtr Bondaweb
- Wadding, ideally not 2oz polyester
- Clover black fusible bias binding **
- Invisible/monofilament thread or black thread for machining
- Bobbin thread
- Tacking thread
- Pins and needle
- Fabric scissors – large and small ideally
- Paper scissors
- Pencil and ruler
- Black permanent marker pen, thin to medium nib
- Low tack masking tape – don’t buy especially
- Sewing machine with all necessary bits and pieces including manual. You may not get as far as machining so bringing your machine is optional. I will talk you through the whole process
Please test your machine in the few days before the workshop. It is always a shame when people lose valuable workshop time sorting their machines out and I am no expert! You will be using blind hem stitch ( ---v---v--- ). If you don’t have this stitch then a zigzag stitch will do just as well. If you have an open-toe satin stitch foot then bring that as well. I use a size 70/75 needle as it makes smaller holes.
** Although there are a couple of other makes of the fusible bias I recommend the Clover one as it seems to be the best quality and the easiest to use. You will need seven metres for each design and it is available on ten metre rolls.
Christmas Stained Glass Patchwork
Introduction
This is a method that uses Bondaweb.
There is a choice of four designs - Poinsettia, Three Kings, Partridge in a Pear Tree (slightly more advanced than the previous two) or I Saw Three Ships
Requirements
- Background fabric – A fat quarter is large enough for the poinsettia, the partridge and the ships. The Kings is slightly larger and needs 40cms. A light coloured fabric makes life easier as the pattern can be seen through it
- Backing fabric – same size as front, usually black
- Small pieces of fabric for the picture, colours will depend on which design you wish to do. As this isn't a piecing method glitzy fabrics with a slight stretch can be used, but not fabrics with a pile
- 10mtr reel of black fusible bias binding **
- 0.5 mtr (minimum) Bondaweb or similar fusible web
- Wadding- same size as backing
- Black fabric to bind edges
- Invisible/monofilament thread or black thread for machining
- Bobbin thread
- Tacking thread
- Pins and needle
- Fabric scissors – large and small ideally
- Paper scissors
- Pencil and ruler
- Black permanent marker pen, thin to medium nib
- Low tack masking tape – don’t buy especially
- Sewing machine with all necessary bits and pieces including manual. You may not get as far as machining so bringing your machine is optional
** I recommend Clover as it is the easiest to work with
Please test your machine in the few days before the workshop. It is always a shame when people lose valuable workshop time sorting their machines out and I am no expert! You will be using blind hem stitch ( ---v---v--- ). If you don’t have this stitch then a zigzag stitch will do just as well. If you have an open-toe satin stitch foot then bring that as well. I use a size 70/75 needle as it makes smaller holes.
Free Motion Quilting for Absolute Beginners with Ann Hibberd
Monday 22nd October 2018 10am to 4pm
Requirements
• 9" or 12" simple pieced block (9 patch for example) layered up to practice quilting in the ditch
• 1 mtr calico - light/medium weight or quilting weight cotton **
• 0.5 mtr wadding of choice - preferably not 2oz polyester **
• Thread to tack 'sandwich' or micro tack gun, if you have one
• Thread for bobbin
• Selection of threads for quilting, for instance rayon, cotton machine embroidery thread, metallic
• YLI Monofilament or equivalent
• Sewing machine, cleaned and checked over with extension table (if you have one) and manual
• Walking foot
• Darning foot - open-toed ideally
• Machine needles - top stitch or embroidery size 80, metallic size 80, universal 70 or 80, quilting 75 or 80
• Fabric marker
• Ruler with inches
• Seam ripper
• Thread snips/small, sharp, pointed scissors
• Pencil
. Few sheets paper for drawing on
You don't have to have every size of needle and every type of thread, these are just some suggestions
** Ahead of the workshop you could layer up a sandwich approx 0.5mtr square from this. Don't layer the remainder up as you will need to mark a piece of it before layering up
Cathedral Window extended 'How To' with Fliss at meeting Monday 20th August
Fliss says:-
"I propose to make a cathedral window pincushion so that people have something to take away without a massive project to finish, but they do learn the technique. People will need to bring:
They will need to have a bit of stuffing for their pincushion but probably won’t need to bring that with them on the day.
If people cannot cope with centimetres then use 8-3/4” and 2-1/2” for the fabric squares, and 8” for the card.
It would also be helpful if a few people could bring an iron and board (just a small portable one) as we will need those briefly but it is not worth everyone bringing one. Half a dozen would be good. I will bring one myself. "
Fliss says:-
"I propose to make a cathedral window pincushion so that people have something to take away without a massive project to finish, but they do learn the technique. People will need to bring:
- Fabric one: 2 pieces, 22cm x 22cm
- Fabric two: 2 pieces, 6cm x 6cm. It is important that the edges on this fabric in particular are intact and not frayed.
- One piece of thick paper or thin card, 20cm x 20cm cut nice and square please for a template.
- and hand sewing kit. (to include sewing threads that match their fabrics)
They will need to have a bit of stuffing for their pincushion but probably won’t need to bring that with them on the day.
If people cannot cope with centimetres then use 8-3/4” and 2-1/2” for the fabric squares, and 8” for the card.
It would also be helpful if a few people could bring an iron and board (just a small portable one) as we will need those briefly but it is not worth everyone bringing one. Half a dozen would be good. I will bring one myself. "
Click on photo for larger image
New York Beauty Workshop with Ann Hibberd
Monday 3rd July 2017 10am to 4pm
Ann says:-
"This is a block that involves curved paper piecing. A series of triangles sewn into an arc are then pieced into a quarter circle. Four blocks make a cushion cover, lots of blocks make a stunning quilt! A good stash buster. Traditionally done by machine, foundation piecing can be done by hand as well. "
To illustrate here's a link to Pinterest you may enjoy
Requirements (taken from Spinning Weal website)
This is a block that is split into arcs, some of which are foundation pieced. It can be done by hand but is more usually machine pieced.
Please, please check that your machine is in working order prior to the workshop!!!
This is a block that is split into arcs, some of which are foundation pieced. It can be done by hand but is more usually machine pieced.
- 0.5m freezer paper
- 0.5m Stitch 'n' Tear
- Fabric marker (not permanent!)
- Pencil and sharpener
- Ruler (for tracing lines)
- Masking tape - don't buy especially
- Selection of fabrics
- Pins
- Fabric scissors
- Small, sharp pointed scissors or thread snips
- Sewing machine with 1/4" foot and manual
Please, please check that your machine is in working order prior to the workshop!!!
Post Workshop Notes, Info and Links from Christine
Try 15 minutes practice before each session on your machine
Clean and oil (if necessary) your machine regularly
Anything you can draw, you can FMQ. Have a flat surface all around you to support your quilt. Saves pulls and drags. Drags will cause jerky movements. Don’t push the quilt or pull it, it should glide. Stop and adjust hands often, FMQ on a small area. No larger than a seven inch square or circle. Stop with needle down if you can, in quilt before adjusting. Look where you are going, you don’t want to run into quilted areas.
Plan ahead and draw first. Check both sides of quilted samples, for even stitching
Marking the quilt, try frixion, air erasable pen or Chalk
- Adjustable chair to look down on quilt + cushion
- Arms on work surface to stop tension in shoulders
- Cushion to support back?
- Take breaks
- know your manual, how to adjust top and bobbin tension
Embroidery needle = larger eye, protects special threads from shredding
Sharps = silk fabric, densely woven fabric, use good threads
Metallic = larger needle, coated eye for good thread flow or fast sewing and no shredding.
Microtex = sharp, I like a 65, it is good for most fabrics, the larger size needles will create bigger holes and can break fabric threads.
Quilting\universal needles are ok to use, 60 65\70\80\90
Have quilt sandwiches ready, made with oddments of wadding and fabric, for regular practice
Try different threads and needles, also play with the tension, look at both sides, and write info on samples. Lighter weight threads in the bobbin 50 or 60 cotton, hides and grips top thread well
Match colour of top thread with bobbin thread, same as fabric for best results.
- better quality stitch
- better to use, if your stitch is not even
- you will not get dot of colour on top of quilt from the bobbin
Try to get used using a knee lift if you have one. It lifts and lowers the foot, saves taking hands off the work to lift the presser foot with needle down. Holds work in position
Presser foot, always raise it for threading the top of machine to open the disks. Raise foot for cutting threads, move your work away from you to the thread cutter. If threads are not loose you do not have your needle at the highest point.
YouTube is for good videos
Pinterest and Craftsy has a lot of free material, or courses you can buy and watch online
Try Pinterest and YouTube for free motion quilting and Craftsy for online courses and free booklets. All sites are as safe as they can be
self threading needles good for sewing ends in
502 New Quilting motifs is the name of the book
don't forget health and safety, regular breaks and cushions
anything I have forgotten please let me know
Non slip foot pedal and freebies for Setting up your machine for free motion stitching
Had a look on the internet and here you are, some great freebies
http://so-sew-easy.com/non-slip-sewing-machine-foot-pedal-pad/ Sew a non-slip sewing machine foot pedal pad
https://www.deborahwirsu.com/setting-up-your-machine-for-free-motion-stitching/ Setting up your machine for free motion stitching
https://www.deborahwirsu.com/get-creative-fearless-free-motion-stitching-for-beginners/ Fearless free motion stitching for beginners
https://www.craftsy.com/blog/2014/01/free-motion-quilting-for-beginners/ 10 Beginner Tips for Successful Free-Motion Quilting
https://www.barnyarns.co.uk/machingers-quilters-gloves-s-m.html Shop for Quilters Gloves
https://www.barnyarns.co.uk/supreme-free-motion-slider.html Shop for the Supreme Slider
https://www.cottonpatch.co.uk/acatalog/Machingers-Gloves-CPW196.html Shop for Quilters Gloves
Free Motion Quilting Workshop with Christine Mackinnon
Monday 22nd May 2017 10am to 4pm
Monday 22nd May 2017 10am to 4pm
Requirements below or download
| fmq.doc |
Equipment
- Sewing Machine - must be able to drop the feed dog, oiled if needed and cleaned of all fluff, needle down option is good.
- A free motion foot for your machine – or open toe foot, or darning foot
- Sewing machine manual and box of tools
- Extension table or if you have one a Sewezi table
- Rotary cutter, board and ruler, a smaller ruler for marking your fabric
- Quilt marking pen or pencil
- Scissors, large and small for cutting threads
- Hand sewing needles, thimble?
- Thin crochet hook
- Extension cable
- Threads, contrasts, variegated, cottons and lots of filled bobbins and some empty bobbins
- Needles - Microtex are really good, nice and sharp. Or quilting, 70,80 or 90. Please bring a few, in case of breakage. Metallic needles if you would like to have a go. I will bring lots of threads for you to have a go with.
- Simple design plastic stencils
- Paper or sketch book and lots of sharp pencils to keep a record of all the patterns we will trial.
Fabric/ batting/ backing
- A quilt sandwich (approximately 12″ square) no need to baste
- Pieces of wadding, thin 80 20 is best. Must be over 5" square, a good time to use all those leftover bits. Just bring them along in a bag.
- Fabrics, cotton, mostly plains with good contrast for back and front sandwiches. Ironed please, can use an old cotton sheet to cut for the backings
- 4s x 9" squares of plain fabric, nice contrast of colours, wadding 18" square and backing, can use cheesecloth or muslin. This practice piece would make a nice cushion front.
- Simple Shapes cut from a Sizzix or Accuquilt machine in cotton fabric, we will do some raw edge free motion quilting with these. I will bring a few with me.
- Old or new (washed, to get the stiffness out) Tea towel with a picture, wadding and backing to fit. I will bring an old thin tea towel, so please don't buy a new one specially. Flower fabrics are good and hand dyed that have patterns from dyeing.
We are going to draw patterns and step by step increase confidence in free machine stitching.
Cover the basics and some tips to enable you to go home with lots of samples.
The introductory stitches can then be worked into other designs and shapes. It is so freeing to stitch this way, you just need to practice often, it is like writing, you develop your own style.
Looking forward to seeing you all again in May, regards Christine
Happy Villages Finishing Instructions and Quilting Video
Christine Mackinnon says "If I remember I mentioned it to one table as I was going around and forgot to give everybody the same information."
Finishing Instructions
"I like to put a light cotton backing on so that the wadding doesn't catch on or over the feed dog to quilt it.
Once it is all finished I put the backing on, on mine I used felt and used a silk binding. Other ladies have added a Patchwork border, or a plain sashing and backing then quilted the borders. By quilting onto a a light backing it hides all the ends before you put the final backing on. "
Quilting Video
Here's a YouTube video of Karen Eikmeier (Happy Villages lady) showing how to quilt the village.
Thanks to GillB for finding this.
Happy Villages Workshop with Christine Mackinnon
Monday 30th January 10am to 4pm
First, links you may find of interest:-
Christine says "Please bring a light lunch for a flexible timed break. I will arrive by 9.30am to set up, ready to start at 10am.
If you are not sure you want to do a large picture, please bring a large size piece of wadding as well to have a play, we can do a trial piece first.
Step by step your little village will magically come to life. A layer of tulle and machine or hand stitching will complete your fabric collage project."
Requirements detailed below or download
| happy_villages_workshop_requirements.doc |
Happy Villages Requirements
Finished size: 16½” square.
Fabrics
Choose 10 fabrics and from each fabric cut ONE square and ONE rectangle. You will need to cut the 10 squares of fabric to measure 6½ inches square, and the 10 rectangles should measure 6½” x 2”. These can be cut at the workshop if you are undecided on your village. Please look at landscapes, photographs and holiday places for ideas for your village. My first was a fun village, a bit like the Cinque Terre but with gold roof tops and lots of colour, plus free machining. You can have libraries, pubs, churches and clock towers in your village, the list is endless. Greece is good, white building and blue and yellow rooftops. A nativity scene?
1. Dark Purple 6. Red
2. Lavender 7. Yellow
3. Dark Blue 8. Orange
4. Medium Blue 9. Deep Pink
5. Light Blue 10. Medium Green
You need good contrasts, lights and darks
PLEASE BRING FABRICS TO ADD SKY, TREES, WATER, BEACH ETC… (approx 1/4 yard each) hand dyed are great and fussy cut shapes from fabrics you like.
For rooftops and windows: bring an assortment of stripes, checks, plaids and fabrics with a small scale single print. Or plain and we will look at free machining the patterns
Supplies
Most of the workshops I have taken, the ladies have wanted to take the village home unstitched and play further with them. So, you can bring machines (give them a good clean and oil, new needle before the workshop please), extension cables, walking foot, darning foot and variegated threads – cotton or rayon. (Hand quilting thread for the hand-stitching) Just in case you finish your village. I will be doing a demonstration on free machine quilting and using a walking foot on the machine. If you make a small quilt sandwich first you can practice on this and I can help if there are any problems,
If you have tulle, sparkly or plain or organza - bring a couple different colours to ‘audition’…black or red works surprisingly well. I will have both to show you in different colours and you can take ideas away with you and purchase the colour you want later on. I will bring websites with me for where to purchase or you can look on eBay, they seem to be the best and cheapest. To finish the hanging, it is nice to back with black felt. You can add borders, patchwork and bindings as desired, the choice will be yours. I have lots of pictures and ideas.
Any questions please email me at [email protected]
Warm regards and looking forward to seeing you all soon
Finished size: 16½” square.
Fabrics
Choose 10 fabrics and from each fabric cut ONE square and ONE rectangle. You will need to cut the 10 squares of fabric to measure 6½ inches square, and the 10 rectangles should measure 6½” x 2”. These can be cut at the workshop if you are undecided on your village. Please look at landscapes, photographs and holiday places for ideas for your village. My first was a fun village, a bit like the Cinque Terre but with gold roof tops and lots of colour, plus free machining. You can have libraries, pubs, churches and clock towers in your village, the list is endless. Greece is good, white building and blue and yellow rooftops. A nativity scene?
- 10 colours, look for textures, solids, and no large scale prints
1. Dark Purple 6. Red
2. Lavender 7. Yellow
3. Dark Blue 8. Orange
4. Medium Blue 9. Deep Pink
5. Light Blue 10. Medium Green
You need good contrasts, lights and darks
PLEASE BRING FABRICS TO ADD SKY, TREES, WATER, BEACH ETC… (approx 1/4 yard each) hand dyed are great and fussy cut shapes from fabrics you like.
For rooftops and windows: bring an assortment of stripes, checks, plaids and fabrics with a small scale single print. Or plain and we will look at free machining the patterns
Supplies
- Rotary Cutter, bring wave/pinking/scallop blades if you have them, don’t buy especially, pinking shears are great, I will demo them.
- Ruler or small square ruler 6.5”, cutting mat
- Pinking shears
- Small plastic bags to keep cut shapes in, about 12. Not essential, you can just keep them all in a basket.
- Roxanne’s Glue-Baste-It™ or fabric/tacky glue with applicator tip, maybe by one or two for the group. Or a strong pva glue and cocktail sticks and dishes
- Large and small fabric scissors
- Long Pins for basting (bring basting thread and needle if you will be finishing by hand)
- 16½” x 16½” square of Batting (BRING PRE-CUT TO WORKSHOP) 80.20 is fine. Again the group could buy large quilt size wadding and share the cost, saving some money?
- Tweezers
- Marking pencil or pen
Most of the workshops I have taken, the ladies have wanted to take the village home unstitched and play further with them. So, you can bring machines (give them a good clean and oil, new needle before the workshop please), extension cables, walking foot, darning foot and variegated threads – cotton or rayon. (Hand quilting thread for the hand-stitching) Just in case you finish your village. I will be doing a demonstration on free machine quilting and using a walking foot on the machine. If you make a small quilt sandwich first you can practice on this and I can help if there are any problems,
If you have tulle, sparkly or plain or organza - bring a couple different colours to ‘audition’…black or red works surprisingly well. I will have both to show you in different colours and you can take ideas away with you and purchase the colour you want later on. I will bring websites with me for where to purchase or you can look on eBay, they seem to be the best and cheapest. To finish the hanging, it is nice to back with black felt. You can add borders, patchwork and bindings as desired, the choice will be yours. I have lots of pictures and ideas.
Any questions please email me at [email protected]
Warm regards and looking forward to seeing you all soon
Japanese Folded Patchwork with Ann Hibberd
Monday 11th December 10am to 4pm
Ann says:- By folding one shape over another you will make finished units - no raw edges! In the workshop you will get the chance to try various different shape combinations. You will go home with several samples and lots of ideas for incorporating them into projects.
Requirements
- Fabric - dress weight 100% cotton, usually one plain or textured fabric and one patterned one. You could use several different combinations if you like
- Template plastic
- Cereal box card
- Fabric marker
- Fine permanent marker
- Pins
- Needles
- Thread to match fabrics
- Thread for tacking
- Fabric scissors
- Paper scissors
- Small amount of wadding, preferably not 2oz polyester
